Extend Gibraltar With Your Own Extensions - Try Our Samples
Today’s quick Advent post is on how to build the Gibraltar Add In Samples we ship so you can use them to get started with your own extensions to Gibraltar.
You can create custom addins to extend Gibraltar Analyst and Hub in a variety of neat ways.
Building the Sample Project
Once you’ve installed Gibraltar you’ll find an SDK folder in C:\Program Files (x86)\Gibraltar Software\Gibraltar\SDK . To build the Gibraltar Add In sample:
- Be sure to exit Gibraltar Analyst, it won’t find our new Add In until it starts up later in the process.
- Copy the CSharp Samples folder (C:\Program Files (x86)\Gibraltar Software\Gibraltar\SDK\Samples\CSharp) to a directory where you keep code - this avoids interference from UAC while building things.
- From the CSharp folder, open the solution that corresponds to your favorite version of Visual studio. In this example I’m going to open “GibraltarSamples_VS2010.sln”. Tip: This works with Visual Studio 2012 as well since they use the same file formats.
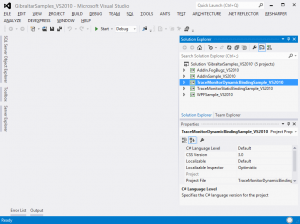
- You’ll now see a window like the following. You’ll notice that while I opened the VS2010 solution it opened up in VS 2012 since they use the same file format and that’s what I have installed.

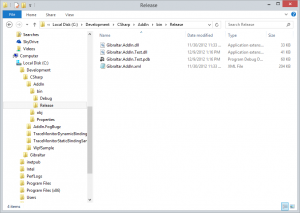
- Once it’s compiled, we need to copy out the add in and put it in the user add in folder. You can navigate to the compiled sample by right-clicking on the AddInSample_VS2010 project and selecting Open Folder in File Explorer . From this window navigate down into bin\release which should look like the following:
Deploying the Sample
- Now we have to copy the necessary files to run the sample to the Gibraltar Add In folder. You can read more about this folder in the online documentation. On Windows Vista and later the folder is C:\ProgramData\Gibraltar\Add In. We will copy just “Gibraltar.AddIn.Test.dll” to this folder - this is the compiled output of the sample. Note that by default the ProgramData folder won’t show in the File Explorer - but you can type it in to the navigation bar and it’ll open up.
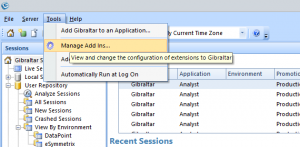
- Just because it’s in the right folder won’t cause Gibraltar to use it. Each AddIn has to be enabled. To do this, start Gibraltar Analyst. Once it’s running, go to the Tools menu and select Manage Add Ins.

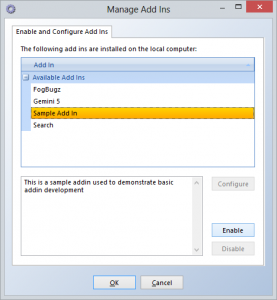
- From the list of Add Ins select the “Sample Add In” from the list and click Enable. You’ll see an example configuration dialog display, and once you click OK the add in will be enabled. Click OK to dismiss the Manage Add Ins dialog and you’ll be prompted that Analyst will need to restart.

- Once Analyst starts you can try out the various samples. For example, you can right-click on a session in the repository viewer and select “Save Session As Text” which will create a text file of the contents of the session for you.
You can do a lot with Add Ins - once you’ve got the sample working for you, check out the various extensions it has to get some ideas for things you can do to create your own custom exports, integrate with external systems, or even custom visualizations for session data that extend the Analyst UI!
You can dig into more details on Add ins through the online documentation:
While you’re contemplating all the possibilities of things you can do with add ins, why not take a few minutes to tell us what we should build in for everyone?
